How to create your own PHP MVC Framework
1. The theory
The MVC pattern help us to solve one of the main problems in any application, REPEATED CODE.
Having repeated code in an application makes it hard to maintain.
We are going to use OOP and MVC design pattern to separate our code into different components.
With the MVC pattern we will divide our code in 3 main components:
- The model
- The view
- The controller
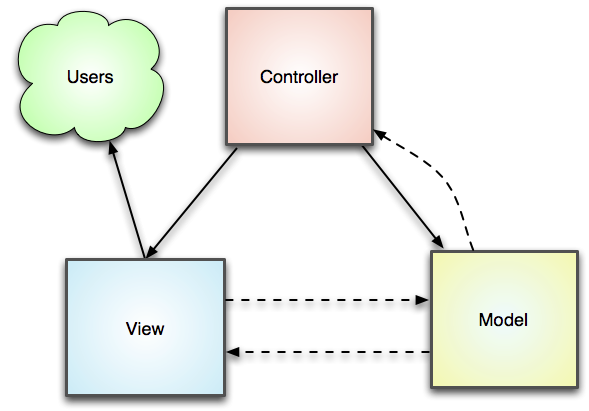
The dotted arrows represent that changes in source component will carry on changes in the destination component. Changes in the model’s state will be reflected in the view.
Model
The model will be used for the business logical. All the classes that are in our class diagram of our problem must be here. In a typical web application this is where our entities must reside.
The model is the part of our application who knows if a phone number must be an string, an email must contain the ‘@’ character, …
In the model we also implement the associations between the different classes.
View
The view will be used for the presentation logical. Is where the end user interacts with our application. He can change the state of our models introducing data, removing data, updating data … He also can request for the state of any object, listing articles for example. All of that can be done if the user has the privileges for that.
Controller
The controller will be used for communicate the view with the model and vice versa. The controller does not know about the nature of the data, it does not know if a phone number is an string, … The only one task for our controller is to decide which model to use for resolve the actual request and which view has to return as a response.
Front Controller
In this approach we will also use the Front Controller pattern. This pattern is to have only one entry point to our application. Every request will go to the front controller, it can be viewed as an special controller which decides which concrete controller must handle the actual request and also can pass to that controller all the dependencies needed.
The workflow
Let’s see the work flow of a request:
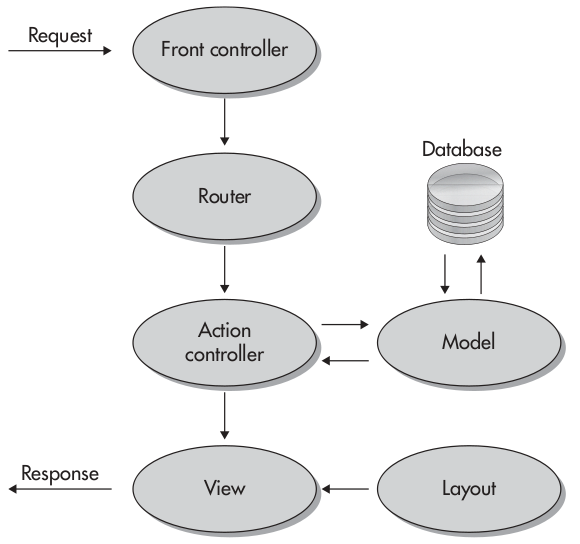
When a new request arrives, will be the Front Controller the responsible of manage it.
The FC job with the help of the router is to choose one controller and to delegate to it the request.
A controller can do different actions, the router will select the correct action from that controller too.
An action in a controller is the point where communication between the model and the view take place.
The model can also have access to persistent data.
And the view can use a Layout where all common parts of the different views are stored (like header and footer). The Layout also determines the structure of every page.
Finally when the action controller selects one view, it will be rendered as a response to the initial request.
2. The code
As an example, we will create a simple calculator application.
2.1. index.php
You have all the code in this repository: https://github.com/itrascastro/MVC
First we create the directory structure of our application.
One directory for each MVC component, application and another one for the public stuff, included our Front Controller, the index.php file.
As we only have one file accessible, every request must include in the url the information about the controller who will handle that request. In a enterprise framework that information will be extracted from the url using the router. For us it will be more simple, the url already contains the routing work done.
So we have the controller and the action in the GET super global variable.
public/index.php
<?php
chdir(dirname(__DIR__));
require 'application/controllers/IndexController.php';
require 'application/controllers/CalculatorController.php';
if (!isset($_GET['controller']))
{
    $controllerName = 'controllers\\IndexController';
    $action         = 'indexAction';
}
else
{
    $controllerName     = 'controllers\\' . ucfirst($_GET['controller']) . 'Controller';
    $action             = $_GET['action'] . 'Action';
}
$controller = new $controllerName();
$controller->$action();
If the controller is not setted, then the ‘IndexController’ and the ‘indexAction’ will be called. Otherwise we construct the name of the class and the name of the method using the GET variable.
The use of chdir function is to make all paths relative to the application folder.
Finally we call the action controller method to generate the response.
2.2. The controllers and the view
Let’s to create the controllers.
The controllers are classes with methods called actions. Each action will be a different url of the application. So in a controller we group actions that have any kind of relation.
The first one will be the IndexController. This controller will only have an action also called index. This action is the responsible of show a menu to the user with the calculator’s 4 basic operations.
application/controllers/IndexController.php
<?php
namespace controllers;
class IndexController
{
    public function indexAction()
    {
        require 'application/views/index.phtml';
    }
}
So we require that view file from the views folder.
Now we have to create that view.
application/views/index.phtml
<?php require 'application/layouts/header.phtml'; ?>

<ul>
    <li><a href="/index.php?controller=index&action=index">Index</a></li>
    <li><a href="/index.php?controller=calculator&action=sum">Sum</a></li>
    <li><a href="/index.php?controller=calculator&action=subtract">Subtract</a></li>
    <li><a href="/index.php?controller=calculator&action=multiply">Multiply</a></li>
</ul>

<?php require 'application/layouts/footer.phtml'; ?>
Here we also require the different parts of the layout, the header and the footer.
To be able to use the IndexController in the index.php file, we have to require it.
The namespace and the suffix controller are also added.
CalculatorController
Now is time for the CalculatorController.
We are going to create the actions for each one of the calculator operation url’s.
In fact we need two actions for each operation:
- One will be used to show the form
- And the other one to call the model, who will be the responsible of the business logical
So we create the form view with a view variable called $action. The same view can be used for each operation. We are not repeating code.
The doSumAction is the responsible of sending the operators to the model. This action also receives the result and passes it to the result view.
application/controllers/CalculatorController.php
<?php
namespace controllers;
use models\CalculatorModel;
require 'application/models/CalculatorModel.php';
class CalculatorController
{
    public function sumAction()
    {
        $action = 'doSum';
        require 'application/views/form.phtml';
    }
    public function doSumAction()
    {
        $model = new CalculatorModel($_POST['op1'], $_POST['op2']);
        $model->sum();
        $result = $model->getResult();
        require 'application/views/result.phtml';
    }
    public function subtractAction()
    {
        $action = 'doSubtract';
        require 'application/views/form.phtml';
    }
    public function doSubtractAction()
    {
        $model = new CalculatorModel($_POST['op1'], $_POST['op2']);
        $model->subtract();
        $result = $model->getResult();
        require 'application/views/result.phtml';
    }
    public function multiplyAction()
    {
        $action = 'doMultiply';
        require 'application/views/form.phtml';
    }
    public function doMultiplyAction()
    {
        $model = new CalculatorModel($_POST['op1'], $_POST['op2']);
        $model->multiply();
        $result = $model->getResult();
        require 'application/views/result.phtml';
    }
}
application/views/form.phtml
<?php require 'application/layouts/header.phtml'; ?>

<form method="post" action="/index.php?controller=calculator&action=<?php echo $action; ?>">
    <input type="number" name="op1"><br>
    <input type="number" name="op2"><br>
    <input type="submit" value="ok">
</form>

<?php require 'application/layouts/footer.phtml'; ?>
2.3. The Model
Let’s to create the CalculatorModel. Here is where the business logical takes place.
The constructor stores the operators. And each method sets the result depending on the operation.
application/models/CalculatorModel.php
<?php
namespace models;
class CalculatorModel
{
    private $_op1;
    private $_op2;
    private $_result;
    public function __construct($_op1, $_op2)
    {
        $this->_op1 = $_op1;
        $this->_op2 = $_op2;
    }
    public function sum()
    {
        $this->_result = $this->_op1 + $this->_op2;
    }
    public function subtract()
    {
        $this->_result = $this->_op1 - $this->_op2;
    }
    public function multiply()
    {
        $this->_result = $this->_op1 * $this->_op2;
    }
    /**
     * @return mixed
     */
    public function getResult()
    {
        return $this->_result;
    }
}
Now from the action controller we pass the result to the view.
The result view is used to show the result of the operation.
application/views/result.phtml
<?php require 'application/layouts/header.phtml'; ?>

    <?php echo $result; ?>

<?php require 'application/layouts/footer.phtml'; ?>
As we have done before with the IndexController, we also have to require the CalculatorController.
Adding new operations to our calculator is very easy. We do not have to create new views or new models for that.
3. Summarizing
If you see that you have repeated code in two different places of your code, think in putting that repeated code somewhere accessible from those two places. It can be in a service or in a model.
In fact, that is the main reason why we must place the validation inside our models and not in the controllers neither in views (even worst).
I would also like to post this image:
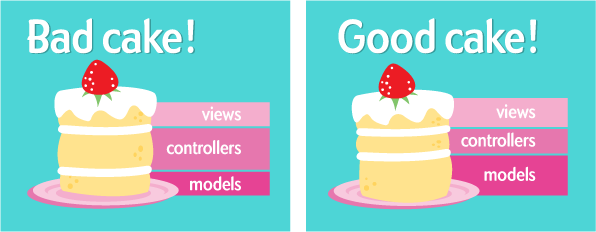
If you are doubting if some piece of code must go in the controller or in the model, think about where it will be more reusable. Controllers are not reusables, however models are.